You can also add many signatures, like digital or picture signatures. All the signatures are easy to create and add to the documents. You can also do the same by attaching them to the documents and following the process mentioned below. So go through the article below and decide for yourself which one you wish to add.
How to Insert Signature in Word?
A document with a signature will provide somebody with a location to sign a printed document. Hence, when you plan to print a Word document, adding a signature is the easiest method. Please refer to the steps below to add a signature to the Word document.
- Go to menubar in Word and select Text.
- Click Insert on the Signature Line.
- In the “Signature Setup” box, fill your signature details. Note: You can include the name, title, and email address here.
- You can provide instructions for the signer.
- Select “OK” to insert your signature. After confirming the signature options, a signature line is inserted to signify where to sign. This is how you can learn how to insert signature in Word. You can place the signature in an appropriate position within the Word document. The document can be signed now after printing. You can insert a digital signature when you save the Word document into the DOCX file format. Also read, How to Copy Conditional Formatting in Microsoft Excel
How to Insert Digital Signature in Word?
To add a digital signature to the Word document, follow the above instructions and insert a signature first. You have to install a security certificate for the signature. Word will ask for the same when you do not have one, and you can acquire one from a “Microsoft Partner”. You can create a digital certificate with a third-party tool in Microsoft Office installation folder. To insert a digital signature in Word, follow the guided steps below.
- Find the third-party tool “Selfcert.exe” in your Office installation folder and double-click to open it.
- In the Selfcert tool, type name in the “Your Certificate Name” box and tap “OK.”
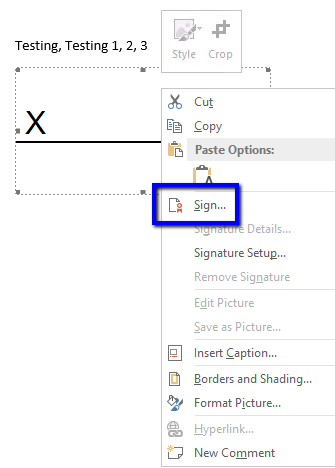
- When the digital certificate is installed, return to the Word document and double-click on the signature.
- In the “Sign” box, type your name and click “Select Image” to insert a picture of handwritten signature.
- Click “Sign” to insert a digital signature.
- Once signed, Word will confirm the signature is added. Note: If you edit the document after signing, the digital signature becomes invalid, and you must sign again. Also read, How to Create Slicers in Microsoft Excel | Filter Data Now
How to Add Picture Signature in Word?
Apart from using a handwritten signature in word, you can take a picture, scan a copy, and upload it to your computer. Insert a picture of the signature in the Word document. To use Picture Signature in Word, please follow the steps below.
- Select Insert.
- Select Pictures to insert images in the document.
- Double-click on the signature line and click on “Select Image” to insert.
- On the menu bar select “Insert Pictures” and choose “From a File” to select a signature image.
- Click “Sign” to place the image onto the signature line.
- When the picture signature is inserted, the image file with the signature will be inserted above the signature line. Also read, How to Make Gridlines Darker in Microsoft Excel | 2 Methods
How to Insert Digital Signature in Word?
Wrapping Up
When you want to insert signature in word file, you can do it in digital format or as a picture signature, whichever you wish. I hope there are no more queries regarding how to insert a signature in a word file. We have explained all the needed steps required to insert your signature. I hope they are helpful to you.
Δ


